The SKIRT command line program, including the interactive console Q&A to configure simulations, does not depend on the Qt development environment or run time facilities. You may still wish to install Qt, however, to build and use the optional MakeUp utility, which offers a graphical user interface for configuring SKIRT parameter files as a more user-friendly alternative to the console Q&A. Apart from this, Qt Creator is an excellent C++ source code editor and build environment. So you can use it to configure and build the SKIRT code as an alternative to the command line build procedure.
This topic contains the following sections:
Install the build tools and get the source code
As a first step, you need to install the basic build tools (git, CMake, and C++ compiler) and obtain a local copy of the SKIRT source code, just like you would if you were not using Qt. Follow the instructions appropriate for your operating system:
There is no need to configure and build the SKIRT code according to the platform-specific instructions, because that will be accomplished with Qt Creator as described below.
Install the development environment
The optional MakeUp program that is part of the SKIRT project requires Qt Desktop v5.9.0 or later.
In addition to cross-platform run-time libraries, the Qt development environment includes a convenient integrated code editor/builder called Qt Creator. All of these components can be installed with a single installer.
Download the installer
- Go to the Qt download page.
- Follow the "Open source" or "Qt community edition" button.
- Follow the "Download the Qt online installer" button.
- Select and download an installer appropriate for your system.
Open the installer
Select the components to be installed
- Follow the on-screen instructions to initiate the installation. You may need to create a Qt account. You will also be asked to choose the installation folder for Qt; it is best to keep this at the default value.
- When the "Select Components" screen is shown, select a recent release, and unfold the item that is marked as the Qt version to be installed. In the list that appears, uncheck all items except the one corresponding to your desktop operating system (e.g. "macOS" or "Desktop").
- Press continue and follow the subsequent steps until the actual installation starts.
Make a shortcut to Qt Creator
- At the end of the installation, you can choose to open Qt Creator. This gives you an opportunity for creating a permanent shortcut to Qt Creator in your dock or task bar. Right-click the application icon in the dock or task bar and select "Lock" in the popup menu (or equivalent operation depending on your operating system).
- Alternatively, locate the Qt Creator application in the newly installed directory, and drag the application icon to your dock or task bar (or equivalent operation depending on your operating system).
Configure the build tools in Qt Creator
- Open Qt Creator if needed.
- Show the Qt Creator preferences panel (depending on your operating system, choose the menu item "Qt Creator -> Preferences..." or "Tools->Options...").
- Select the "CMake->Tools" tab and verify that Qt automatically detected the correct version of CMake installed on your computer. If not, manually add it to the list. Important note for macOS: configure the command line version of cmake that resides inside the CMake.app directory, i.e. /Applications/CMake.app/Contents/bin/cmake, rather than the CMake.app GUI application itself.
- Select the "Kits->Compilers" tab and verify that Qt automatically detected the compilers installed on your computer. If not, manually add a suitable C and C++ compiler.
- Select the "Kits->Qt Versions" tab and verify that Qt automatically detected the Qt version you just installed. If not, manually add an appropriate Qt version.
- Select the "Kits->Kits" tab. If there are muliple kits, verify that the appropriate kit is marked as "Default". Verify and if needed configure the properties of the default kit, specifically "Compiler", "Qt version" and "CMake
Tool". The "CMake Generator" property should be set to "Unix Makefiles ..."
- Press "OK" to accept any changes and close the preferences panel.
Install system libraries if required
On some Unix systems other than macOS, the Qt libraries used by the optional MakeUp tool in the SKIRT project depend on extra system libraries. On Ubuntu these libraries can be installed as follows:
sudo apt-get install libgl1-mesa-dev
Configure and build the code
Building for the first time
Open the project file
- Open Qt Creator.
- Choose the menu item "File->Open File or Project...".
- From within the dialog, locate and select the file
CMakeLists.txt in your SKIRT/git directory (at the top level, not in one of the subdirectories).
- Press the "Open" button in the dialog.
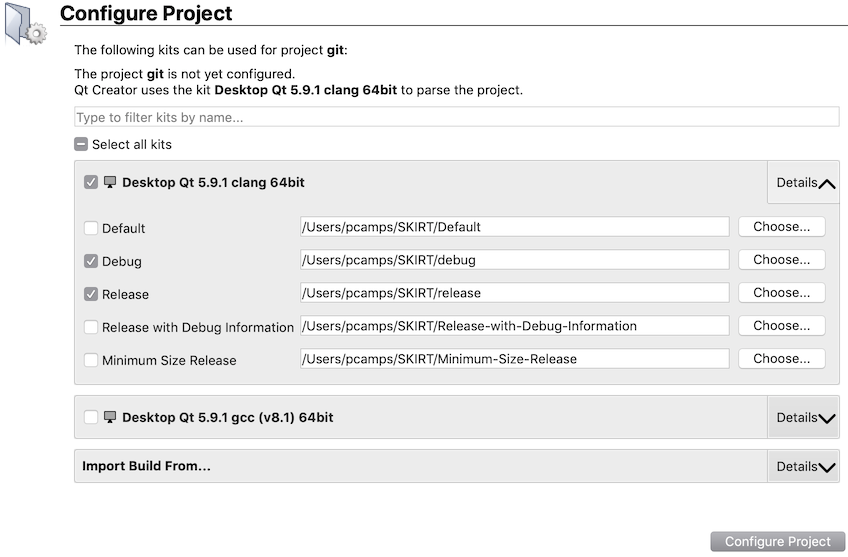
Qt Creator now displays an initial configuration pane for the SKIRT project in its main window, similar to this:
Configure builds for the project
In the configuration pane shown above:
- Uncheck all kits except for the kit you want to use (most likely, just your default kit is being shown).
- Open the details for that kit, and uncheck all build types except for "Debug" and "Release".
- Change the build paths to
~/SKIRT/debug and ~/SKIRT/release, respectively.
- Press the "Configure Project..." button, which causes Qt Creator to switch to regular "Edit" mode.
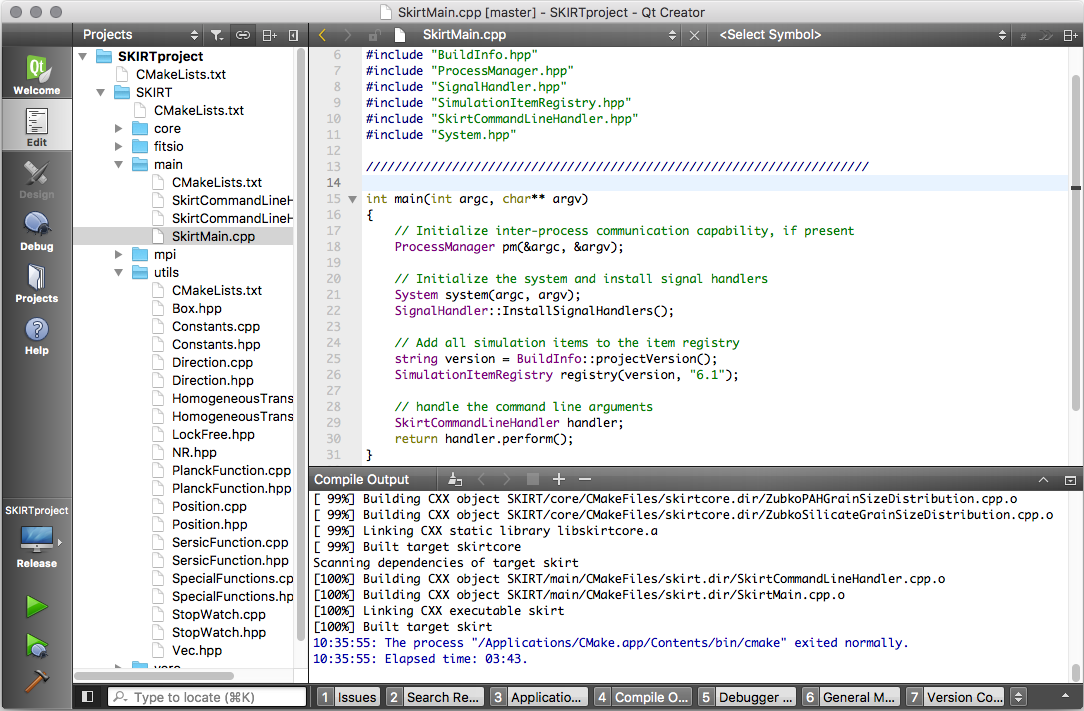
Build the project
- Select "Edit" mode in the left margin of the Qt Creator window, unless that mode is already shown.
- Click on the icon resembling a computer screen near the bottom of the left margin of the Qt Creator window to bring up a popup pane listing the various builds configured for your project.
- In that popup pane, select the "Release" build and the "skirt" run configuration.
- Click the hammer icon in the lower left corner of the Qt Creator window to compile and build the SKIRT project with the current build options.
- Select the "Compile Output" tab at the bottom of the Qt Creator window to view the build log.
Your window should now look similar to this:
Adjusting build options
By default, the procedure described above builds just the SKIRT command line program. To build additional programs such as MakeUp, or to enable capabilities such as multi-processing, you need to adjust the corresponding build options. For a list of build options, see Use the SKIRT build options (all platforms).
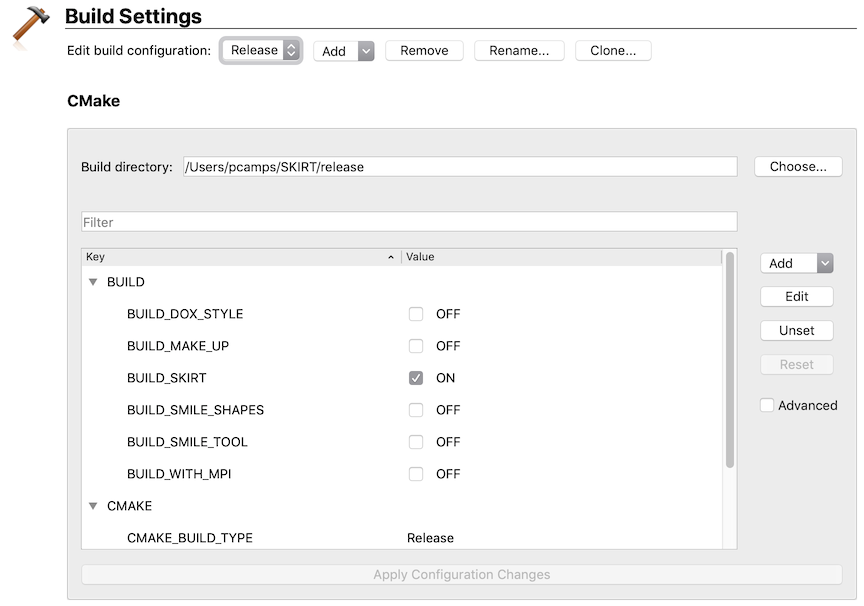
Qt Creator offers built-in support for configuring build options and passing them on to the CMake build tool. To use this feature, select the "Projects" mode in the left margin of the Qt Creator window, and then select the "Build" item in the lefthand column of the window, just below a header stating the name of your default Qt kit. Your window should now look similar to this:
In this window, Qt Creator shows a list of CMake variables that control the build.
- Use the checkboxes or the "Edit" button to adjust one or more values in the list. For example, to build the MakeUp utility, enable the checkbox next to the BUILD_MAKE_UP option.
- Press the "Run CMake" button at the bottom of the list. This causes the changes to be integrated into the CMake configuration, and the list of variables shown to be updated accordingly.
- In some cases, you need to repeat this process:
- A new option may appear because you enabled the options on which it depends. To adjust such dependent options, you need a second round of adjustment.
- CMake may fail to locate the appropriate paths for an option you enabled. If so, you need another round of adjustment to override these values manually.
- After all changes to the configuration have been applied, go back to "Edit" mode and press the Hammer icon to (re)build the code.
Finalize the installation
As the last step, you need to finalize and verify your installation just like you would if you were not using Qt. Follow the instructions appropriate for your operating system: